Flee the Facility Survivor Guide: Hack, Rescue & Escape
A Survivor-only round plan for reading warnings, finishing computers, saving teammates, and reaching the exit without throwing away safe progress.

What should a Survivor do first?
A strong Flee the Facility survivor guide starts with one rule: create progress before you create danger. Move to a computer with more than one exit route, watch the room while hacking, and leave early when a warning gives you useful information. A finished computer helps every teammate, while an unnecessary capture attempt can remove a player from the round.
The Survivor job is a loop rather than a single trick: locate a workable computer, hit skill checks, listen for the Beast, rotate when the room becomes unsafe, rescue only when the route is reasonable, and regroup for the doors. Keep checking the shared objective instead of staying loyal to one plan after the round changes.
Scope note: Exact maps, prompts, and balance can change. Treat the live HUD and the developer's current rules as the source of truth when they differ from a remembered tip.
Build a Survivor round loop instead of chasing highlights
Survivors share one win condition: complete the required computers and escape through an exit before the round ends. That makes information and time more valuable than a flashy solo play. Before touching a computer, glance at nearby windows, vents, doors, and long corridors. You are choosing a future escape route as much as you are choosing a work spot.
Use a simple three-question check every time you move. What objective can the team finish next? What warning tells me the Beast is close? Where can I go if the answer changes? This prevents tunnel vision when a skill check, a distant hit sound, or a teammate's capture suddenly changes the safe route.
A good Survivor does not hide for the entire round. Hiding is a short information reset: break sight, listen, then decide whether to return to the computer, rotate to another objective, or help a teammate. Staying still while the team needs progress creates the same losing pressure as rushing into an obvious chase.
Keep your language consistent with your group. Short callouts such as 'safe computer', 'Beast near center', 'pod left side', or 'door ready' communicate more than a long story after the danger has passed. In solo queue, use your movement and the shared objective as the signal other players can read.
Read sound, lights, and teammate signals
Flee the Facility survivor tips are most useful when they explain what to do with a signal. A warning is not an instruction to panic. It is a prompt to stop the current action, scan the nearest exits, and choose whether the computer is still worth the risk.
Audio often gives you the first clue, while the Beast light or visual warning confirms direction and urgency. The exact range and timing can vary with the live game, so do not memorize a fixed number of seconds. Instead, compare the warning with the room: open rooms allow a quick rotation, while a dead end needs an earlier exit.
Watch teammates as information sources. A player suddenly leaving a computer, a door that opens, or a pod marker that appears can reveal the Beast's route before you see the Beast. Share the information by moving decisively; a correct rotation that teammates can follow is better than a perfect callout nobody has time to process.
Audio warning
Pause the skill check, face an exit route, and decide whether the room still has two usable paths.
Beast light or visual cue
Treat direction as more important than a memorized distance. Rotate before the route collapses.
Completed computer
Assume the finished objective changes patrol pressure. Move to the next useful computer instead of celebrating in place.
Pod marker
Read the location and the distance together. A rescue is safer when another Survivor can cover the return route.
Open door
An exit is a team resource. Check who is still alive and avoid turning the door into a predictable trap.
Choose computers and rotate before the room becomes a trap
When a round begins, do not pick the nearest computer automatically. Pick the nearest computer that leaves you a way out. A room with two windows or a connected corridor can be safer than a closer room with one narrow entrance. This is why the map guide is a useful companion, but it cannot replace reading the current Beast route.
The safest computer is usually the one your team can finish without stacking every player in one room. Two Survivors may finish faster, but three players in the same dead end can give the Beast one high-value approach. Split when the room is easy to defend and regroup when the objective is nearly complete.
Rotate after a meaningful event: a completed computer, a failed skill check, a nearby hit, or a teammate captured in the same wing. A rotation is not a retreat from the objective; it is a way to make the next attempt from a better angle.
- Scan the nearest computer and list two exits before starting.
- Start hacking only after checking whether a teammate is already drawing pressure elsewhere.
- Use each skill check as a reason to keep your camera and ears active, not as permission to stare at the progress bar.
- Leave with progress when a warning closes your best route; return later if the room becomes safe.
- After a computer completes, announce or show the next objective through your movement.
- Avoid repeating the same unsafe room when another computer offers a better team route.
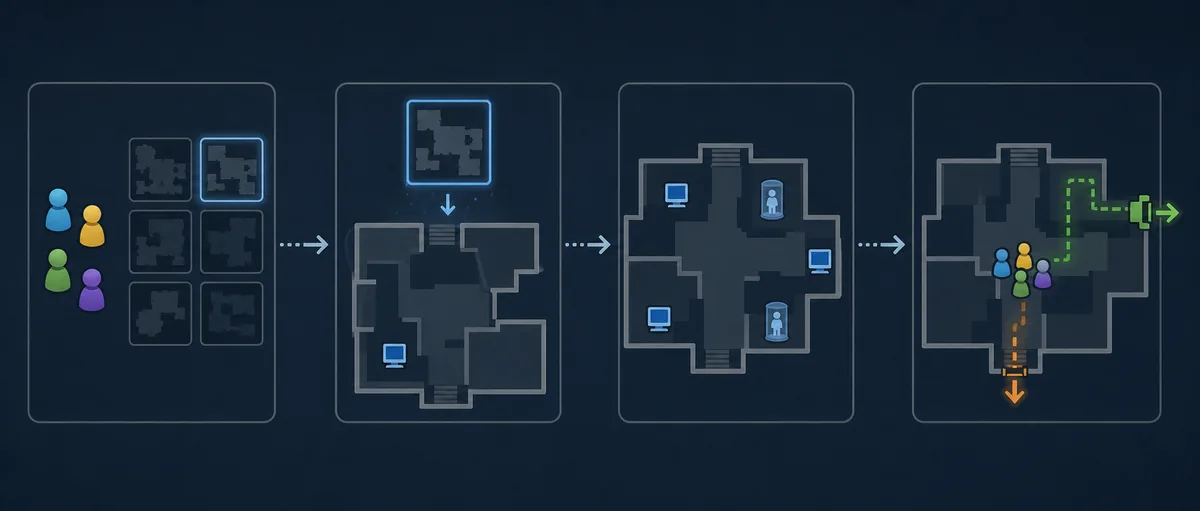
Break a chase without donating a capture
A Survivor chase is successful when it buys time or protects team progress. It does not need to last forever. As soon as you know the Beast has committed to you, run toward a route that makes the Beast spend time while teammates finish a computer, rather than running randomly through the map.
Use windows, vents, doors, corners, and changes in elevation as decisions, not as a fixed loop. If the Beast reads your first turn, change the next turn. A repeated loop becomes predictable, especially when the route ends at a pod or a wall.
Break line of sight before hiding. A hiding spot only works when the Beast no longer has a direct reason to check it. After you disappear, listen for the direction of movement, then choose a new computer or support route instead of returning to the exact place you were found.
Stamina and camera control matter more than speed claims. Preserve enough movement to reach the next cover point, and do not burn every option in an open room. If you escape, use the time you bought: finish an objective, change sides of the map, or set up a safer rescue.
- Exit before contact If the warning arrives while you are in a dead end, leave before the Beast reaches the doorway.
- Choose a purpose Run toward a window, a teammate, or a safer wing. A route with a purpose is easier to abandon when it fails.
- Change the second turn Do not repeat the same window or vent sequence after the Beast has seen it.
- Hide after sight is broken Crouching in view is not a reset. Reach cover first, then listen for the next movement.
- Leave the chase When the route stops creating value, take the safer exit and return to objective work.
- Use the time A successful escape matters because it gives your team time to hack, rescue, or reach a door.

Rescue teammates with a return route
Rescue decisions separate a reliable Survivor from a player who rushes toward every pod. Before approaching, check whether the Beast is still nearby, whether another Survivor can help, and where you will run after the release. A rescue without a return route can create two captures instead of one save.
Use the pod marker as a planning point. Approach from a side that offers cover, wait for the Beast's attention to move, and leave immediately after the interaction finishes. If the rescue is clearly unsafe, continue a computer or prepare a door so the next rescue has more pressure behind it.
A trade save can be correct when the round is near its end, but it should be a deliberate exchange. Ask whether freeing the teammate changes the exit count, buys enough time, or lets another player complete the final computer. Do not sacrifice yourself merely because the pod is visible.
After a successful rescue, do not all hide in the same corner. Spread enough to make the next signal useful, then regroup where the next objective or door can be reached.
Finish computers and open the exit as a team
The endgame begins before the final computer finishes. Track who is healthy, who is near a pod, and which exit side the team can reach. If everyone runs to the same door without checking the Beast route, the last phase becomes a single predictable approach.
When the last computer is close, one player can watch a route while another finishes, provided the room still has a safe escape. After the door becomes available, move with a purpose: one Survivor can start the interaction, another can watch the approach, and a third can pull attention away without throwing away a guaranteed exit.
Do not assume the first open door is always the best door. Compare distance, cover, and the number of teammates who can reach it. If a door is unsafe, rotate early instead of waiting beside it until the Beast arrives.
A clean escape is quiet and repeatable. Leave when the route is open, help only when the rescue has a plan, and remember that surviving is the outcome the team is trying to produce.
- Count the remaining tasks Use the shared progress state and the live HUD; do not rely on an old fixed number remembered from another round.
- Assign simple jobs Finish, watch, rescue, or pull pressure. Clear jobs reduce three players making the same unsafe move.
- Watch the approach A door interaction is loud and predictable. Keep a route watcher where the team can react.
- Change doors when needed If the Beast reads the first exit, spend the time to reach the safer one rather than freezing in place.
- Leave the moment is good A last-second rescue is optional when the exit is open and the team can safely escape.
Survivor decisions for common situations
Use this table as a prompt, not a rigid tier list. The right answer depends on the live route, teammate positions, and whether the Beast has information about your location.
| Situation | First question | Safer action | Avoid |
|---|---|---|---|
| You hear a warning at a computer | Is the nearest exit still open? | Pause, scan, then rotate if the route is closing. | Finishing a bar while ignoring the room. |
| A teammate is captured far away | Can another player cover the return? | Continue progress or set a door while a planned rescue forms. | Running alone through a known Beast route. |
| The last computer is nearly done | Who can watch the approach? | Finish with a route watcher and move toward the safer exit. | All Survivors stacking in one dead end. |
| The Beast sees your first loop | Where is the second escape? | Change the turn, break sight, and leave the chase when value ends. | Repeating the same window forever. |
| A door is open but a teammate is down | Can the team escape without a trade? | Leave if safe; rescue only when it changes the outcome. | Sacrificing an exit for a low-probability save. |
| You lost sight of the Beast | What objective gains the most time? | Listen, reposition, and restart useful work from cover. | Hiding until the round ends. |
Common Survivor mistakes and the fix
Most failed rounds are not caused by one bad skill check. They come from repeating a decision after the information changed. Use the following fixes when reviewing a loss.
- Tunnel vision on the progress bar. Look up between skill checks and leave when the room becomes unsafe. Progress is useful only if you remain available to finish the next task.
- Choosing the nearest computer every time. Choose the computer with a workable exit and a team-friendly route, not just the shortest walk.
- Rescuing on autopilot. Check the Beast route and your return path. A rescue that creates two pods is not automatically a good trade.
- Repeating a chase loop. Change direction after the Beast reads your turn. Break sight and reset instead of donating a predictable hit.
- Hiding without a next action. Use hiding to gather information, then return to a computer, rescue, or door plan.
- Ignoring the last phase. Track exits, health, and pod positions before the final computer finishes so the team is not surprised by the door route.
- Treating a guide as a fixed rule book. Maps, prompts, and balance can change. Verify the live room and the developer's current rules when a remembered tip conflicts.
Keep Survivor strategy inside the current game rules
Strategy is more useful when it can be used in a normal public round. Do not turn a guide into a promise that a specific exploit, hiding spot, or timing window will always work. If a mechanic looks like a bug or an unintended lock, leave it out of your routine and check current developer guidance.
The official rules can change, and the game may enforce conduct differently across updates. Use the rules page for the current boundary, while this article focuses on ordinary movement, teamwork, and objective decisions.
Good team play also means letting a round end. Do not harass players for a missed skill check, and do not ask someone to break rules just to prove a strategy. A repeatable, fair plan is more valuable than a clip that only works once.
Flee the Facility Survivor guide FAQ
Flee the Facility Survivor guide summary
A dependable Survivor builds progress while preserving a route. Start computers from safe rooms, read warnings as information, rotate before a chase becomes a capture, and rescue teammates only when the return path is real.
The final computer and the exit are team phases. Assign simple jobs, watch the approach, change doors when necessary, and leave when the route is safe. A Survivor who keeps the shared objective moving gives every teammate more options.
Use this Flee the Facility survivor guide as a decision loop, then adapt it to the live map, current prompts, and current rules. The best tip is the one that still works after the round gives you new information.
Official sources and editorial notes
- Flee the Facility on Roblox: Official game listing and description of the run, hide, and escape premise.
- Flee the Facility Game Rules: Developer forum rules page used for the fair-play boundary; check it again when the game updates.
- Flee the Facility maps guide: Related site guide for map context; this article keeps map inventory and tier judgments separate.